I really like getting feedback and will respond to comments.

So please, won't you leave me some footnotes!

Better yet.......... Become a follower!

I'll follow you back!

Do You See What I See? Check out the images I've found!
Print Friendly and PDF

Sunday, January 30, 2011

GIFTING IT FORWARD


Would anybody like to win a pair like one of these?

Or these?

Or these?


Recently I've been having some nice bloggers be good to me.


Back in November, when I purchased my Silhouette, I used Beckie's, from Infarrantly Creative, code and she sent me some Bottlecap Magnets she made herself. Thank-you, Beckie!


Then...
Several weeks ago, I inadvertently entered a giveaway at Simply Southern. I say inadvertently, because I just went to the blog from a linky party to see a project someone had done. I liked it and commented on it, but kinda skimmed over the giveaway part, 'cause usually I don't enter giveaways; except for the Silhouette giveaways, which I didn't win. So, anyway, I happened to win this one without even trying. WooHoo! This is the goody package I received in the mail.
A Photo Block, which I put my Grandchildren's picture cards on from Christmas,  a paper mache star, some lovely scripture cards, a checkbook cover, and matching keychain. Wow! What a nice haul! Thank -you Debbie!

And...


Just this past week, I was awarded the Stylish Blog Award, by Melinda at Mocrochet. Thank-you, Melinda!


In appreciation of all these, I would like to gift it forward and send a pair of crocheted slippers to the winner of this giftaway. It will be their choice of style, color and size. I will be adding this to my PROMOTERS linky parties this week.


To enter this giftaway:


#1 US residents only, please.


#2 Become a follower, if you are not already. (Follow at the bottom of the page.)


#3 Leave me a comment stating which pair you would like to have, either for  yourself or a special someone. Make sure you leave me an email address if you don't have a blog so I can get a hold of you!


#4 Open from now until February 6, 2011 11:59 Central time.


#5 Drawing will be held February 7, 2011.


#6 Winner will have 72 hours from when I post to contact me, before I choose another winner.


GOOD LUCK!

I'm keeping this low tech, so I'll just ask my hubby to pick a number between 1 and ? (depending on the number of comments). I won't tell him what I'm asking for until after he picks. He doesn't read my blog, so no danger of him knowing ahead of time.


OK

READY,
SET,
COMMENT! 


Have A Gifted Day!
Linking to:
Photobucket

Friday, January 28, 2011

BLOG REVIEW PARTY

b&b 4

I am so excited to be part of a very unique blog hop. Gail @My Repurposed Life and MeganDVD @ Beauty in the Attempt are hosting “The Bold and the Beautiful-your blog reviewed”.
Please take a look around my blog, check out the layout, pages, buttons,  sidebar and gadgets. I would love for you to gently critique my blog. I’m hoping you will leave me some positive feedback about my blog. It would be great if you could give me constructive criticism but be sure to tell me what you like about my blog too! Do you like my pictures? Does my blog load quickly for you? How about the font?  All tips and tidbits welcome!
You are welcome to join the party, it starts Thursday night and is open for a week.


Photobucket

Thursday, January 27, 2011

BLOG AWARD

Melinda from MoCrochet visited my blog made a comment on my Teapot recipe holder and then gave me my very first blogging  award. 
Thank-you Melinda!!!


So here's how the award works:

First -  I have to reveal several things about myself:

1. I married my high school sweetheart and we have been together totally for nearly 40 years!

2. I like to sing, especially when I'm   doing my chores; my son absolutely hates it. He insists I can't sing.

3. I'm a counter, mostly when I'm measuring out large quantities, like water that doesn't have to be exact. I guess maybe I'm borderline OCD. So, how do I combat this? I sing! HA!

4. I have 4 children, 3 girls , 1 boy and 4 grandchildren, 2 girls, 2 boys. I probably would never have  been nominated for mother of the year, but my kids all made it to adulthood not drug addicts and not in jail. Hey,what more would you want? They all went to college and I am proud of every one of them!

5. I'm a blog stalker. I follow 138 blogs in Blogger alone and nearly 200 total; all via Google Reader. I love to prowl the linky parties looking for new ideas.

6. I asked Gary, my husband, to list some interesting things about me and these are what he came up with. Now remember he loves me, so he may be biased.
- Very self-motivated and determined person in planning a trip, building a project, and so on.
- Loves her family, even ME!
- Flower lady and gardening (not so sure about this,'cause God does most of the work)
- Smart
- Cougar


Don't ya just love that last one! He really has a sense of humor.


Second - Pick 3-5 blogs you admire and pass on this award linking back to the person who gave you the award (in this case, me).  Make sure to leave a comment on their blog that they have won.

1. Amy of WhisperWood Cottage and Junkologie
She has a clean looking blog and she always comes to visit my blog when I leave a comment on hers. She's a member of the DIYClub.

2. Maria@BubblegumandDuctTape
Maria is always visiting my blog and leaves such nice comments.
She shares a lot of fun projects and fun info about herself.


She has a colorful blog and shares a lot of fun projects and funny commentaries.


She's another DIYClub gal and has a nice blog with lots of projects. She also has a weekly linky party called Tickled Pink.


5. Roeshel @ the DIY Showoff
Yet again, another of those DIY Club gals, with a nice clean looking blog and lots of projects.


6. Becky @ Beyond The Picket Fence
She has a nice looking blog with a scrapbook feel to it and she hosts the Under $100 Linky Party every week.

Have An Award Winning Day!
Photobucket

Sunday, January 9, 2011

CROCHET BALLET SLIPPERS


My daughter wanted some ballet type slippers. I looked at several patterns online and did not like any of them. For one thing, they didn't seem to have much substance for slippers. I made up my own pattern. I started with my trusty Slipper Sock  pattern and developed it from there.


**You are welcome to use the pattern, and even sell any slippers you make from it, but please don't sell the pattern and pass it off as your own. Kindly link back to this post if you use it.**
**If you see a mistake in the pattern or something is not clear, email me and I will try to help.**
email me


Here's the pattern:
Crochet Ballet Slippers

Materials
Worsted weight yarn approximately 6-8 ounces
(Can be made with 1or 2 colors)
Crochet hooks size I and size H
Large button

*Note: These are made with 2 strands of yarn.
Instructions for womens size 11. For smaller sizes, use a smaller size hook, or do a few less rows in the ribbed part.

Right Slipper

Rnd 1: With size I hook and 2 strands of yarn, ch 2, work 5 sc info 2nd ch from hook to form a circle. Mark last st of this rnd with a pin, then move pin to mark the end of each succeeding rnd.

Rnd 2: Work 3 sc into each sc around: you should have 15 sc.

Rnd 3: * 2 sc in first sc, sc in each of next 2 sc, rep from * around:  20 Sc.

Rnd 4:  * 2 sc in first sc, sc in each of the next 3sc, rep from * around 25 sc.

Rnds 5-12 Work even on 25 sc, making sure to move your marker each round.

From now on sc in the back loop only.

Rnd 13 Ch 1, turn. Sc in back loop of  next 18 sc.

Rnds 14-31 Ch1, turn. Sc in back loop of each sc across. (18sc)

Dec Row 1: Ch 1, turn. Sc in each of next 7 sc, dec over next 2 sts as follows: draw up a loop in each of the next 2 sts: 3 loops on hook, YO and pull through all 3 loops on hook, dec as before over next 2 sts, sc in each of next 7 sc.

Dec Row 2: Ch1, turn. Sc in each of next 6 sc, dec over next 2 sts, twice, sc in each of next 6 sc.

Dec Row 3: Ch1, turn. Sc in each of next 5 Sc, dec over next 2 sts, sc in each of next 5 sc; ch 1, turn.

Fold back section in half, carefully matching sts. Sl St inside loops of sides tog. Fasten off.

Edging and strap

With the size H hook, attach 1 strand of yarn in the first stitch to the left side of the back joining with a sl st.

Rnd 1: Ch 1, sc evenly around top left  rim of slipper (about 3 sc per row on the sides), in each sc across front, and  evenly around top right rim of slipper. Join with sl st to first sc.

Rnd 2: *Ch 1, sc in next sc, dec over next 2 sc. Repeat from * 8 more times.
Ch 30, join with sc in 10th sc back from chain in same row, sc in next sc back in same row.
Ch1 turn, skip first sc, sc in next sc and in each chain back around. (strap)
*sc in next sc, dec over next 2 sc. Repeat from * around to back. Join with a sl st and fasten off.

Left Slipper

With the size I hook, crochet the main part of the slipper the same as the left one.

Edging and strap

With the size H hook, attach 1 strand of yarn in the first stitch to the left side of the back joining with a sl st .

Rnd 1: Ch 1, sc evenly around top left  rim of slipper (about 3 sc per row on the sides), in each sc across front, and  evenly around top right rim of slipper. Join with sl st to first sc.

Rnd 2: Count 13 stitches to the right of the back joining and place a stitch marker.
* Ch 1, sc next sc, dec over next 2sc. Repeat from * around to the marked stitch. 
Ch 30, join with sc in 10th sc back from chain in same row, sc in next sc back in same row.
Ch1 turn, skip first sc, sc in next sc and in each chain back around. (strap)
*sc in next sc, dec over next 2 sc. Repeat from * to back joining and fasten off.

Weave in ends. Sew a button  on the opposite side from strap directly across from the center of the strap on each slipper.


Alternate finishing:


Edging

With the size H hook, attach 1 strand of yarn in the first stitch to the left side of the back joining with a sl st.

Rnd 1: Ch 1, sc evenly around top left  rim of slipper (about 3 sc per row on the sides), in each sc across front, and  evenly around top right rim of slipper. Join with sl st to first sc.

Rnd 2: Ch 1, * sc in 1 sc, dec over next 2 sc. Repeat from * around.

Rnd 3: Repeat rnd 2.

Rnd 4: Sc in each st around. Fasten off and weave in ends.


You can see the finished variation HERE!
Visit thecsiproject.com
Photobucket

Saturday, January 8, 2011

CUTTING BOARDS

These are the cutting boards we made for our future daughter-in-law for Christmas.


Here they are before oiling.

We bought a scroll saw last summer and finally got it set up to make these.  We traced a couple of my cutting boards onto an oak board for the pattern. When Gary came in with the new boards and asked me if I liked them, I was thrilled. I loved them and told him we may have to make some for me! Gary did the initial sanding on the belt sander and I did a little final touchup by hand. Then I oiled them with mineral oil and after that soaked in, I waxed them with beeswax. That is supposed to close up the pores of the wood some, so bacteria can't get in. I think they turned out wonderful!

Have a "cut-free" day!

Photobucket

Friday, January 7, 2011

ICE CREAM SUNDAE GIFT BASKETS

I made these gift baskets for some friends for Christmas, but they would be appropriate at any time of year I think.


Here's what's in them.
 Apothecary type jars of sprinkles, toasted pecans, and mini M&M's.
Homemade strawberry, pineapple, and hot fudge sauce.
An ice cream scoop and 2 bowls with a vinyl ice cream sundae cutout, I made with my silhouette.

I was going to add 2 bananas, but when I bought them they were green and looked good. After a couple of days ripening, they started looking crappy, with brown bruising areas on them, so I figured the baskets would look better without them. 

The baskets were up in my junk room and I cleaned them up, whitewashed them with some thinned down acrylic paint ,and sponged some gold paint on for accent. One of the baskets was an old Easter basket, so I cut the handle down and glued it into the weaving with super glue. The pink and green showed through the whitewash a little, but I think it just gave it more character. I added some frayed fabric in the bottom of each basket, filled them with the goodies and wrapped them up. The cellophane wrap is some that I bought more than 5 years ago at a white elephant store. I got a whole roll for $1.00 and usually use it at least once for a gift each Christmas. I still have at least half of it left, so I'm good for another few years. The ribbon was left over from my middle daughter's wedding.
They turned out pretty nice, but I'm not sure how long the vinyl is going to last through washing.

Have a sweet day!

Photobucket

Thursday, January 6, 2011

BLOG CHANGE

I changed the template of my blog. Whadda think????

Photobucket

TEAPOT RECIPE HOLDER

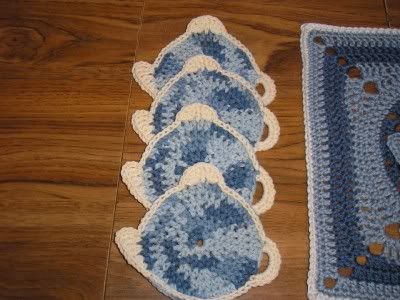
This a crocheted  recipe card holder to put on the fridge or other metallic place. I made this for a dear lady who is the mother of a friend of ours and makes us kringles several times a year. They are delicious, and I have been unable to duplicate her recipe.

I got my inspiration for the base from this teapot coaster.


I just used the coaster pattern, but it is meant to be part of a square for an afghan. The directions can be found at this forum, but I'll reprint the coaster directions here for simplicity. 
Sorry, but the lady who developed the pattern decided she did not want me to reprint the pattern after all, but link to it on her forum, so you can find the pattern HEREI am nothing if not cooperative.

The pattern is
“Vicki’s Teatime” 
12” Crochet Square 
And Teapot Coasters 
Copyright © 01-29-06 All Rights Reserved 
Kathy Hudgins, Designer 


This is how I made the rest of it:
I took apart a spring type clothespin and painted the wood part with acrylic paint. - I used the color linen. 
Then I wrote RECIPES on the front section and drew a little flower with a paint pen.
I threaded the metal spring into the teapot coaster and then reassembled the clothespin, with a wooden section on each side. 
I glued a small magnet to the back with tacky glue. 
That's it. Easy Peasy!


Have a tasty day!

Photobucket

Wednesday, January 5, 2011

FEATURE, FEATURE, HOORAY IN THE BLEACHERS!

My Stacked tables Plant Stand is being featured this afternoon on
So head on over and check out my project, HERE.
Thanks, Cassity, for the feature!!!


While you're there, poke around a bit and see all the wonderful crafts and DIY projects you can get inspiration from. 
You'll be glad you did.
Be sure to make a comment on some post and tell Cassity, I sent you over.

Photobucket

CHRISTMAS GOODIES

These are the tools I got for Christmas.
I got the Dremel trio, which I hope works good and doesn't break bits, like I've read in some reviews. I will  have to settle with reading the user manual for now, since it's too cold to work outside or in the garage. I will be so prepared, that when the time comes, I can get to it and use that baby!


I also got  a Double Edge Pull Saw. Not the one I had on my Amazon list, but that was just for reference anyway. Doesn't matter to me the brand, just the fact that it has a flexible blade, so you can cut stuff off flush and not leave scarring on the project. This is an Irwin and the blade removes from the handle for storage. Very Cool!


See that big thing in the back I used as a background? That's the fancy schmansy router table I bought for Gary! I can't wait til we can set it up and use it. I say we, 'cause I've watched so many woodworking shows and it looks so cool that I want to try my hand at using a big router. On Gary's cheapy table I bought him years ago, it just didn't seem to work as easily as they show on TV. Even he didn't care for it. Funny thing, a few weeks before Christmas, Gary needed to rout something and of course, didn't want to use the one he had, so he called his brother and asked if he had a router table. Luckily he did, so I didn't have to pony up Gary's Christmas present ahead of time.


I can't wait for the weather to warm up so I can use them. It's times like these, I wish we had a full basement.


Photobucket