I really like getting feedback and will respond to comments.

So please, won't you leave me some footnotes!

Better yet.......... Become a follower!

I'll follow you back!

Do You See What I See? Check out the images I've found!
Print Friendly and PDF

Monday, August 23, 2010

ROOM SIGN DRAFT

aplaceforusfour.blogspot.com
This is something I would like to make for the home. I was thinking a flag type sign. I was inspired by this blog post at http://aplaceforusfour.blogspot.com/2010/05/hallways-bringing-outside-in.html, except that I would like to do it more frugally and not quite as ornate.
Here is my design:

TRu04

WHAT TO DO WITH THOSE HUMONGOUS ZUCCHINI

Zucchini Cake – 2 versions


Cake with caramel frosting


Bars with powdered sugar topping


Recipe for one cake


Ingredients:
2 cups finely chopped zucchini (I do this in the food processor)
2 cups flour (I use ½ whole wheat, ½ all-purpose)
1 ¼ cups sugar
1 ¼ teaspoon baking powder
1 teaspoon salt
1 cup raisins
1 teaspoon ground cinnamon
1 teaspoon ground nutmeg
1 teaspoon ground cloves
½ cup vegetable oil
3 eggs
1 teaspoon vanilla
½ cup chopped nuts (optional)

Directions:
Put the chopped zucchini and raisins in a mixing bowl and add all the dry ingredients. Mix this with a mixer, just until well combined. Add the oil, eggs and vanilla and beat well, scraping down the sides.
Pour into a pan sprayed with cooking spray and bake @ 350° (40 minutes for a jellyroll pan) (45 minutes for a 13x9 pan) or until toothpick inserted in the center comes out clean. Cool and add your choice of topping.

Now, on to the 2 versions.

If you use a jellyroll pan, you will have zucchini bars. These I sprinkled powdered sugar on as a topping. This is the way Gary likes it.
If you use a 13x9 pan you have a cake. On this one I spread it with Caramel frosting. OOO…yummy! This is the way I liked it.
These also taste great with cream cheese frosting on either the bars or the cake.

Caramel Frosting Recipe


Ingredients:

1 cup brown sugar (packed)
¼ cup milk
¼ cup butter
½ teaspoon salt
1 teaspoon vanilla
1 cup powdered sugar

Directions:
Combine brown sugar, milk, butter and salt in a saucepan. Bring to a boil over medium heat and boil 3 minutes, stirring frequently. Remove from heat and cool. Add vanilla and powdered sugar and beat til thickened. 


Photobucket

Friday, August 20, 2010

OUTDOOR SIDE TABLE / EXTRA SEATING


I wanted to replace the cheap plastic side tables I had in the play area with some to match my Chimney Block Benches, so I designed these which are about half the length of the benches and as wide; basically a square. They are sturdy enough to accommodate extra seating if needed.


Materials
2X6X8 Pressure Treated Boards (2 for each table)
1X4X8 Pressure Treated Boards (2 for each table)
2 1/2" Coated Deck Screws (3 in each corner of the 2X6s, 2 in each end of the braces total of 20)
1 5/8" Coated Deck Screws (1 in each area of the 1X4s, 4 for each board, total of 24)
Deck Stain and Sealer
Chimney Blocks (1 for each table) …(Optional)
Exterior Latex Paint (only if using the chimney blocks)


Tools
Power Miter Saw
Table Saw
Power Drill
Countersink bit
Screw bit
Small Square
Corner clamps or Band Clamp
Pipe Clamps
Paint Brush or Roller

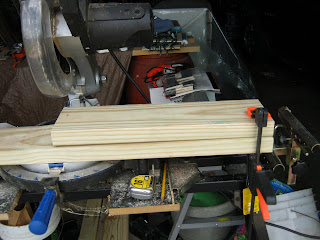
Cut the  boards 


Cut the  boards as shown
 in this image.
Note….these are not to scale, 
just a rough estimate.
I used my first cut board as a pattern 
to make sure all the boards of each 
length were the same length.
Here, I used a stop block to 
measure and cut the 1x4 boards, 
since there were quite a few.
Work on a level surface.
Cut all the boards prior to assembly.
Make a box frame 
Make a box frame by screwing (1) 20"
board on each end of (2) 17" boards, 

with the 2 1/2" screws. 
Use the square to make sure 
all your corners are 90°.

It looks best if you countersink all your screws.


Attach inside bracing. 


Screw (2) 17" boards each
4 1/2” from the center of the frame,
so you have a 9” space in the center. 


Make sure the tops of the boards are flush (even) with the top of the frame.


Attach the top boards. 


Attach the 1x4's to the top 
of the frame;overlapping the 
sides an equal distance all around.
You may find the easiest way 
is to place all the boards and clamp 
them in place; then screw them down.
Use (1)  1 5/8" screw in each board,
over each 2X6 (total of 4 per board).

Attach the legs.


 I originally wanted these to just sit on chimney blocks to match my Chimney Block Benches. However; I didn’t think they would be stable enough, that the kids wouldn’t knock them over onto themselves, so I added legs. Turns out the legs are sturdy enough and the chimney blocks are overkill.
Rip the (2) 16" boards in half on the table saw, (you'll end up with Just over 2 1/2"  width boards). Clamp (1) 2 x 2 1/2 x 16 to each corner and screw in place, (2) screws in each side (4 total in each leg). Sorry, but I forgot to take pics of this step.


Stain and Seal


After the wood has "dried" for about a month, it can be stained and sealed. Use it as is until then. I had the wood laying in the garage for over a month, so I stained them right away. I used a deck stain/sealer in one that I had left over from the deck years ago.


Optional instructions for using chimney blocks.
You will need to paint the blocks with exterior paint, or if you prefer, you can leave them unpainted for a more rustic look. Stand the chimney blocks on end and place the seat over the blocks, so they fit into the 9" spaces underneath. I like it better without the chimney blocks.


With chimney block from end
With chimney block from side


Build{hers} club Button

Photobucket

Tuesday, August 17, 2010

THE COLOSSAL POTATO TOWER VENTURE - "UPDATE"

I haven't taken any pics of my potato tower for a while. It's been so hot, I didn't feel like doing much. Anyway, here's what it looks like today. Some of the plants have died back, but some are still growing.


From what I've researched on this, it says you can rob a few potatoes from the died back plants. So, I harvested a few for supper tonight. These are from the top layer. They look good enough to eat! I think I will, thank-you very much!


gardenMay15,2010 gardenMay27,2010
gardenJune8,2010 gardenJune18,2010

PhotobucketJune29, 2010


Photobucket

Wednesday, August 4, 2010

MAGAZINE COVER ENVELOPE


Are you tied of throwing away your magazines every month? You know the ones you read once, maybe take out an article or two, and then toss it in the recycling bin. Here’s a project you can use the covers for. 
Envelopes!
You can use these for cards attached to presents or if you glue a label on you could probably send it through the mail.

This one is made with a larger than normal magazine. It was about the size of construction paper. Mine happened to be Organic Gardening. This envelope will fit a tri-folded  legal size piece of paper.


And this one is made with a regular sized magazine, folded the opposite way.  My magazine was Ladies Home Journal. This envelope will fit a legal size paper folded in quarter.


Here's how I did it:

Rip off your magazine cover. It doesn't matter if it is not cut, as long as it's fairly straight. This part will go on the underside.


Fold your piece of paper in half, lengthwise. Put just a small crease on the edge of where you want your bottom to be. Or... you can measure and mark this spot. 


This is what it looks like.


Fold the ripped  side over to that center mark and crease down the side. 


Make sure your edge is flush along the bottom.

This pic shows an angle for 
demonstration purposes only. 
Make sure the edges are even!
Fold over the other side making about a ½” overlap. 
Again make sure the bottom edge is flush and crease down the side.


Flush at the edge
Line up your two creases and hold them together straight. Be careful not to crease the folded over part, you don’t want a lot of unnecessary creases in your envelope.


Cut up through both pieces, on the crease line, about 1” and then cut across  the edges to meet  your first cut .
This is what it will look like at this point.


Now, cut  about a 45° angle off of each flap, like so. 


Cut the top flap in the same manner,  then, cut an angle about ½” down on the side to the center cut.


Fold the envelope and crease the  sides well. You could use a bone folder, but I just used the handle of my scissors. 


Glue the overlapped edges together, with the ripped side underneath.


Fold up the bottom flap, crease well  and glue down.


Fold over the top flap and crease , but do not glue. 


This is how the template would look if you needed to do several of these at  once. This one is for the smaller size envelope, but basically the configuration is the same.
I think this one is pretty cool on the front side.