
I really like getting feedback and will respond to comments.

So please, won't you leave me some footnotes!

Better yet.......... Become a follower!

I'll follow you back!

Do You See What I See? Check out the images I've found!
Print Friendly and PDF
Showing posts with label CROCHET. Show all posts

Tuesday, May 3, 2011

Baby Shower Gifts

I attended a baby shower a couple of weeks ago. The mom-to-be likes frogs, so I tailored my homemade gifts to go with that theme.
IMG_0699
Hooter Hider
IMG_0701
I pretty much followed the tutorial here, except I used a metal fastener and I always double seam, to make sure the seams are not going to rip apart easily.
IMG_0699
Frog Hat and Booties
For the booties, I used my standby Best Crochet Slippers pattern, but adjusted the pattern to make them smaller, by using a smaller hook, only one strand of yarn, and less rows.
IMG_0712
For the hat, I followed the pattern here, except I did the eyes a little different and I used 1/4” ribbon instead of yarn for the contrasting edge.
Burp Cloths
IMG_0703
This is the tutorial I followed, roughly. Mine had a more rounded shape on the ends.  To achieve this, I used a dinner plate to trace a pattern of 2 circles, then joined the circles with an inside arc. I used bar towels for the absorbent backside.
Ribbon Tab Toy
IMG_0708 IMG_0707
Here’s what I did:
1) I basically just traced a circle with a dinner plate onto 2 fabrics, 1 cotton and the other fleece and cut them out.
2) Cut various lengths  of ribbons ranging 2-4”.
3) Fold the ribbon strips in half and pin them between the the 2 circles of fabric right sides together, ribbons in toward the middle. 
4) Sew around the edge of the circle with a 14” seam, leaving about a 3-4” opening for turning, (leave out 1 ribbon until after it is turned and stuffed). I always double seam, to make sure the seam is sturdy. Turn it right side out.
5) Wrap a large bell , or several small bells, with poly batting. Put about 1/3 of the batting in through the opening, then put in the wrapped bells and finish stuffing with poly batting.
6) Slip stitch the opening closed along with the last ribbon.
Pacifier Leash
IMG_0706Follow the tutorial here 
Closet Dividers
IMG_0709
For these, I made a template out of cardboard, traced them, and cut the shapes out of foam board. I covered them with contact paper and used acrylic craft paint to color around the edges. I cut out the letters on my Silhouette, applied them, and Bob’s your uncle. Easy Peasy!
Froggy Bank
IMG_0713 IMG_0715 IMG_0718 IMG_0720
I made this bank from a recycled coffee container. It was decaf, since that’s the kind that comes in green.
Here’s what I did:
1) Removed the label with Acetone. They do not make paper labels anymore, but paint them on, so it is a little more difficult to get a label free surface.
2) Clean the container up real well. I place newspapers inside to get rid of the coffee smell. Most of it was gone the next day
3) I cut out the frog and phrases on my Silhouette, but you could easily draw these on with a permanent marker.
4) Cut a slot in the top. I made a frog face (with no mouth) on my Silhouette and placed it so the slot is the mouth and the ears stand up on the edge. I left the backing off on the vinyl behind the ears so they would not stick to the container.
The irony of this is that the container came from the mom-to-be in question!  In fact she asked me what I was doing with it. I told  her I couldn’t tell her and she left it at that.
Gift Bag
IMG_0704
All these goodies went into the gift bag I decorated with a frog.
 Have A Hoppin’ Good Day!
Technorati Tags: ,,,

Tuesday, February 1, 2011

CROCHET RIBBON NECKLACE

I made this necklace for one of my daughters for Christmas.


 Materials and Tools 
1 spool of 1" ribbon
1 spool of 1/4" ribbon
5 large beads
Size H crochet hook
Large embroidery or darning needle

Sunday, January 30, 2011

GIFTING IT FORWARD


Would anybody like to win a pair like one of these?

Or these?

Or these?


Recently I've been having some nice bloggers be good to me.


Back in November, when I purchased my Silhouette, I used Beckie's, from Infarrantly Creative, code and she sent me some Bottlecap Magnets she made herself. Thank-you, Beckie!


Then...
Several weeks ago, I inadvertently entered a giveaway at Simply Southern. I say inadvertently, because I just went to the blog from a linky party to see a project someone had done. I liked it and commented on it, but kinda skimmed over the giveaway part, 'cause usually I don't enter giveaways; except for the Silhouette giveaways, which I didn't win. So, anyway, I happened to win this one without even trying. WooHoo! This is the goody package I received in the mail.
A Photo Block, which I put my Grandchildren's picture cards on from Christmas,  a paper mache star, some lovely scripture cards, a checkbook cover, and matching keychain. Wow! What a nice haul! Thank -you Debbie!

And...


Just this past week, I was awarded the Stylish Blog Award, by Melinda at Mocrochet. Thank-you, Melinda!


In appreciation of all these, I would like to gift it forward and send a pair of crocheted slippers to the winner of this giftaway. It will be their choice of style, color and size. I will be adding this to my PROMOTERS linky parties this week.


To enter this giftaway:


#1 US residents only, please.


#2 Become a follower, if you are not already. (Follow at the bottom of the page.)


#3 Leave me a comment stating which pair you would like to have, either for  yourself or a special someone. Make sure you leave me an email address if you don't have a blog so I can get a hold of you!


#4 Open from now until February 6, 2011 11:59 Central time.


#5 Drawing will be held February 7, 2011.


#6 Winner will have 72 hours from when I post to contact me, before I choose another winner.


GOOD LUCK!

I'm keeping this low tech, so I'll just ask my hubby to pick a number between 1 and ? (depending on the number of comments). I won't tell him what I'm asking for until after he picks. He doesn't read my blog, so no danger of him knowing ahead of time.


OK

READY,
SET,
COMMENT! 


Have A Gifted Day!
Linking to:
Photobucket

Sunday, January 9, 2011

CROCHET BALLET SLIPPERS


My daughter wanted some ballet type slippers. I looked at several patterns online and did not like any of them. For one thing, they didn't seem to have much substance for slippers. I made up my own pattern. I started with my trusty Slipper Sock  pattern and developed it from there.


**You are welcome to use the pattern, and even sell any slippers you make from it, but please don't sell the pattern and pass it off as your own. Kindly link back to this post if you use it.**
**If you see a mistake in the pattern or something is not clear, email me and I will try to help.**
♥email me♥


Here's the pattern:
Crochet Ballet Slippers

Materials
Worsted weight yarn approximately 6-8 ounces
(Can be made with 1or 2 colors)
Crochet hooks size I and size H
Large button

*Note: These are made with 2 strands of yarn.
Instructions for womens size 11. For smaller sizes, use a smaller size hook, or do a few less rows in the ribbed part.

Right Slipper

Rnd 1: With size I hook and 2 strands of yarn, ch 2, work 5 sc info 2nd ch from hook to form a circle. Mark last st of this rnd with a pin, then move pin to mark the end of each succeeding rnd.

Rnd 2: Work 3 sc into each sc around: you should have 15 sc.

Rnd 3: * 2 sc in first sc, sc in each of next 2 sc, rep from * around:  20 Sc.

Rnd 4:  * 2 sc in first sc, sc in each of the next 3sc, rep from * around 25 sc.

Rnds 5-12 Work even on 25 sc, making sure to move your marker each round.

From now on sc in the back loop only.

Rnd 13 Ch 1, turn. Sc in back loop of  next 18 sc.

Rnds 14-31 Ch1, turn. Sc in back loop of each sc across. (18sc)

Dec Row 1: Ch 1, turn. Sc in each of next 7 sc, dec over next 2 sts as follows: draw up a loop in each of the next 2 sts: 3 loops on hook, YO and pull through all 3 loops on hook, dec as before over next 2 sts, sc in each of next 7 sc.

Dec Row 2: Ch1, turn. Sc in each of next 6 sc, dec over next 2 sts, twice, sc in each of next 6 sc.

Dec Row 3: Ch1, turn. Sc in each of next 5 Sc, dec over next 2 sts, sc in each of next 5 sc; ch 1, turn.

Fold back section in half, carefully matching sts. Sl St inside loops of sides tog. Fasten off.

Edging and strap

With the size H hook, attach 1 strand of yarn in the first stitch to the left side of the back joining with a sl st.

Rnd 1: Ch 1, sc evenly around top left  rim of slipper (about 3 sc per row on the sides), in each sc across front, and  evenly around top right rim of slipper. Join with sl st to first sc.

Rnd 2: *Ch 1, sc in next sc, dec over next 2 sc. Repeat from * 8 more times.
Ch 30, join with sc in 10th sc back from chain in same row, sc in next sc back in same row.
Ch1 turn, skip first sc, sc in next sc and in each chain back around. (strap)
*sc in next sc, dec over next 2 sc. Repeat from * around to back. Join with a sl st and fasten off.

Left Slipper

With the size I hook, crochet the main part of the slipper the same as the left one.

Edging and strap

With the size H hook, attach 1 strand of yarn in the first stitch to the left side of the back joining with a sl st .

Rnd 1: Ch 1, sc evenly around top left  rim of slipper (about 3 sc per row on the sides), in each sc across front, and  evenly around top right rim of slipper. Join with sl st to first sc.

Rnd 2: Count 13 stitches to the right of the back joining and place a stitch marker.
* Ch 1, sc next sc, dec over next 2sc. Repeat from * around to the marked stitch. 
Ch 30, join with sc in 10th sc back from chain in same row, sc in next sc back in same row.
Ch1 turn, skip first sc, sc in next sc and in each chain back around. (strap)
*sc in next sc, dec over next 2 sc. Repeat from * to back joining and fasten off.

Weave in ends. Sew a button  on the opposite side from strap directly across from the center of the strap on each slipper.


Alternate finishing:


Edging

With the size H hook, attach 1 strand of yarn in the first stitch to the left side of the back joining with a sl st.

Rnd 1: Ch 1, sc evenly around top left  rim of slipper (about 3 sc per row on the sides), in each sc across front, and  evenly around top right rim of slipper. Join with sl st to first sc.

Rnd 2: Ch 1, * sc in 1 sc, dec over next 2 sc. Repeat from * around.

Rnd 3: Repeat rnd 2.

Rnd 4: Sc in each st around. Fasten off and weave in ends.


You can see the finished variation HERE!
Visit thecsiproject.com
Photobucket

Wednesday, December 8, 2010

THE BEST CROCHET SLIPPERS YOU'LL EVER MAKE!

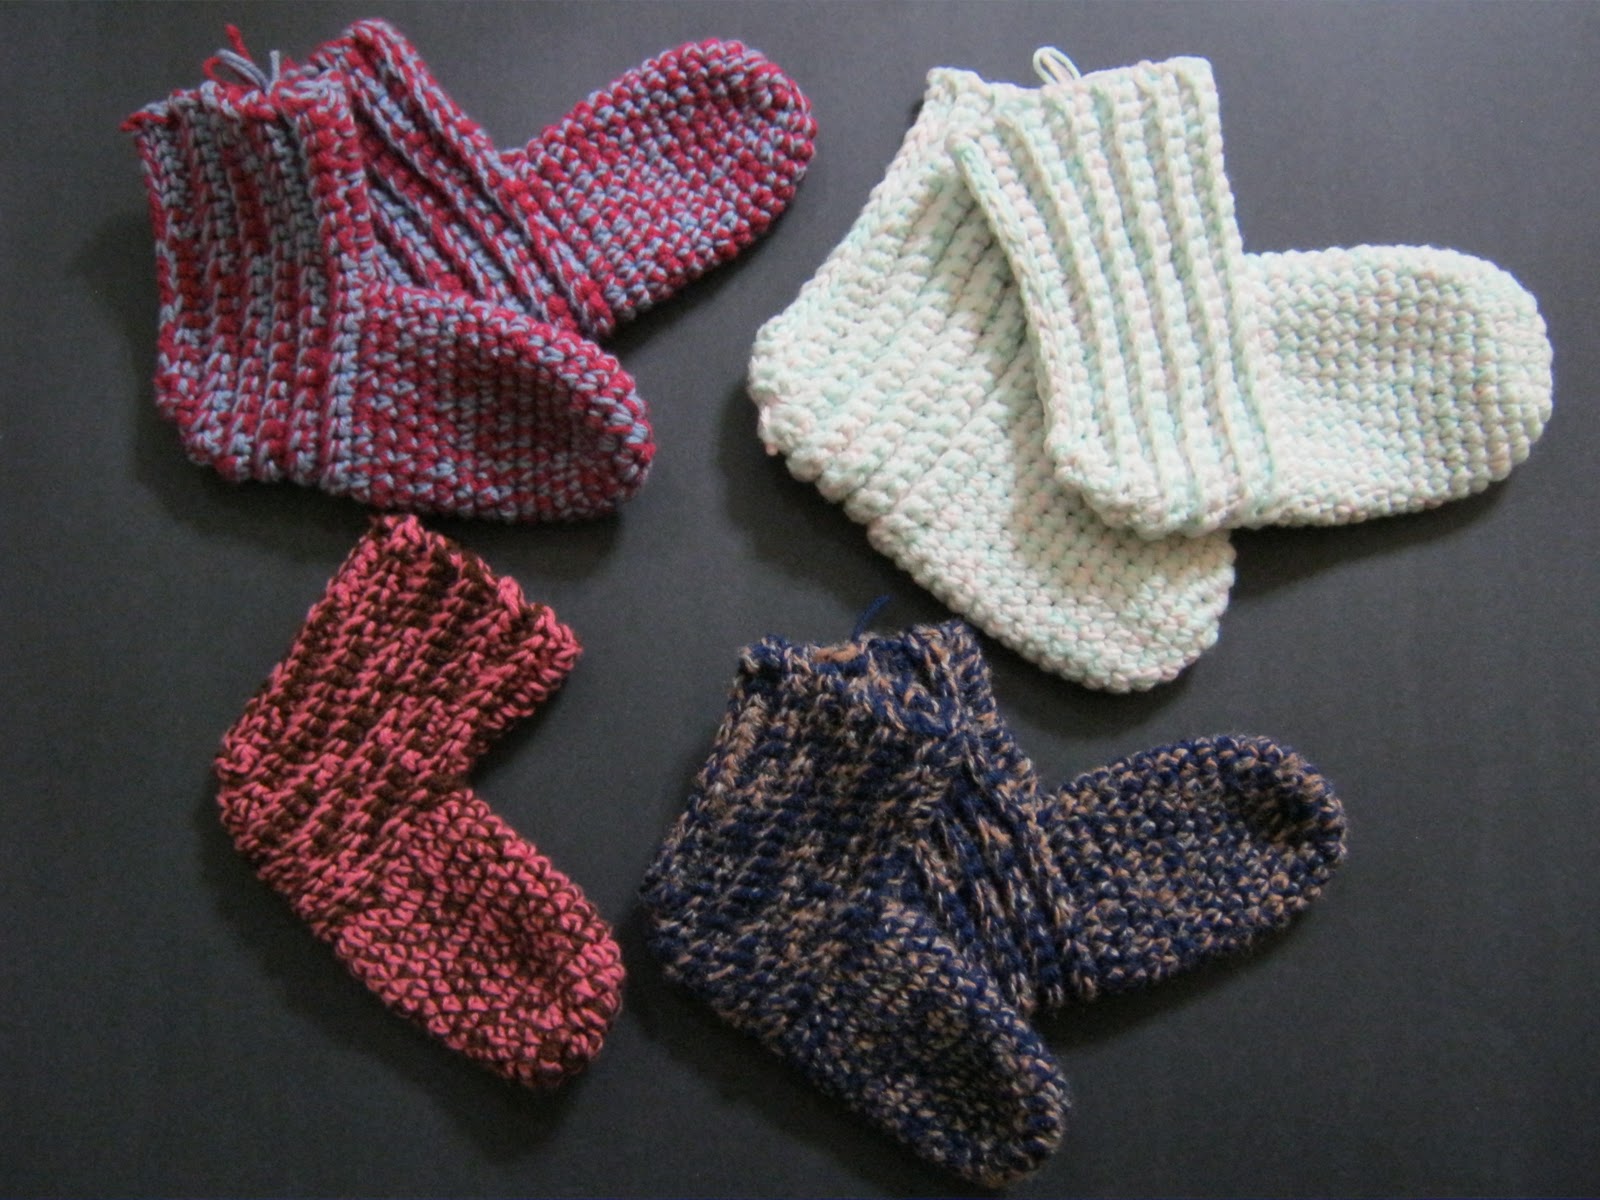
I have been making these slippers for years. First for myself and my kids and now for the grandkids. Some of my adult children still ask for some for Christmas.

These are the ones I've made so far for this Christmas. 3 1/2 pair - I still have 1 1/2 pair to make.

I don't remember exactly where I got the pattern, but it was from some crochet pattern book, back in the 80's I think. I've been recopying it for years and finally put my copy in a plastic page protector, so I don't wear it out.
You know when the felt liners in winter boots wear out? These make good replacement liners. They are thick since they are made from a double strand of yarn.
Check back after Christmas and I'll show you what else I make with just one of these slippers.

So, here's the pattern.


Slipper Socks

Men's:  Fits shoe sizes 8-12
Materials: Worsted weight yarn. 8 oz; size J crochet hook (Canadian size 3) or size needed for gauge.
Gauge: in sc, with 2 strands of yarn. 5 sts and  5 rows = 2".

Women's:  Fits shoe sizes 5-10
Materials: Worsted weight yarn, 8 oz. size I crochet hook (Canadian size 4) or size needed for gauge.
Gauge: in sc, with 2 strands of yarn, 3 sts and 3 rows = - 1".

Children's: Fits shoe sizes 9-12
Materials: Sport weight yarn. 4 oz., size I crochet hook (Canadian size 4) or size needed for gauge.
Gauge: in sc. with 2 strands of yarn, 3 sts and 7 rows = 1".

Size Note: Instructions are written for children s size with changes for women's and men's in parentheses.

Note:    All Sizes are worked with 2 strands of yarn.

INSTRUCTIONS

Rnd 1: Ch 2, work 5 sc info 2nd ch from hook to form a circle. Mark last st of this rnd with a pin, then move pin to mark the end of each succeeding rnd.

Rnd 2: Work 3 sc into each sc around: you should have 15 sc.

Rnd 3: * 2 sc in first sc, sc in each of next 2 sc, rep from * around:  20 Sc.

Rnd 4: For men's and women's sizes only. * 2 sc in first sc, sc in each of the next 3sc, rep from * around 25 sc.
Work even on 20 (25-25) sc for 12 (12-14) rnds more. Do not finish off.
Back: Ch 11.

Row 1: Using both loops, sc in 2nd ch from hook and in each of next  9 ch; sc in each of next 20 (25 - 25) sc; sc in each ch on opposite side of beg ch; ch 1, trun.
You should have 40 (45-45) sc.

From now on, sc in the back loop (loop away from you) of each sc. 

Rows 2-9: Sc in back loop of each sc across; ch 1, turn.

Dec Row 1: Sc in each of next 18 (20-20) sc, dec over next 2 sts as follows: draw up a loop in each of the next 2 sts: 3 loops on hook, YO and pull through all 3 loops on hook, work 0 (1-1) sc, dec as before over next 2 sts, sc in each of next 18 (20-20) sc, ch 1, turn.

Dec Row 2: Sc in each of next 17 (19-19) sc, dec over next 2 sts, work 0 (1-1) sc, dec, sc in each of next 17 (19 -19) sc, ch 1, turn.

Dec Row 3: Sc in each of next 16 (18-18) Sc, dec, work 0 (1-1) Sc, dec, sc in each of next 16 (18-18) sc; ch 1, turn.

Finishing: Fold back section in half, carefully matching sts. Sl St inside loops of sides tog. Finish off 

 !Enjoy! 
And  Have  A Wonderful Homemade Christmas!


Linking to:


Fine Craft Guild
NightOwlCrafting
Blog Button
Beyond The Picket Fence


Catch As Catch Can

504 Main

Join  us Saturdays at tatertotsandjello.com for the weekend wrap up    party!


Photobucket