I really like getting feedback and will respond to comments.

So please, won't you leave me some footnotes!

Better yet.......... Become a follower!

I'll follow you back!

Do You See What I See? Check out the images I've found!
Print Friendly and PDF

Wednesday, May 18, 2011

Silent Auction Donation

I made another bird feeder to donate to the Church’s silent auction they are having in conjunction with their chicken dinner, this coming Sunday.
IMG_0773
I really love the cup on this one. It is a Holstein print on the outside and bright yellow on the inside. I believe it was intended as an ice cream cup, because on the bottom, it said made especially for Ben and Jerry’s Ice Cream. After I got it all done, I liked it so much that I kinda wanted to keep it for myself. Oh, well, if I want it, I’ll just have to bid on it and try to win it. I’m not sure I’ll ever find a cup like that again.
I did a couple of things differently with this one. First, I used clear epoxy for the whole thing. I just feel a 2-
part epoxy will be stronger than a 1-part glue. We’ll see. The other thing I did differently was to cut the copper pipe to a point, after I hammered a flat end on it, with a hacksaw. Hopefully it will poke into the ground easier this way; although, the other way worked ok.
I included a small bag of birdseed and a card with instructions on how to assemble this. Believe it or not, there is a right way to do this. You do not want to put it together and then push it into the ground. You risk breaking the dishes. Also, you do not want to twist the feeder on the post, because if you are using glue, it will loosen the bond. The best thing is to get it into the position you want and slide it on straight. If it’s not quite where you want it, take it off and start again. Trust me, a little caution will save you repairs.
Have a
Mootiful Day!
Technorati Tags: ,,

Thursday, May 12, 2011

Planter Bench Design

I bought an old metal bed at an auction, this past weekend. 
My plans  are to make a planter bench out of it.
Here's my design for how I imagine it to look:

Whadda think?


Photobucket

Sunday, May 8, 2011

Mother’s Day Gift


Here’s what I made for my MIL for Mother’s Day:
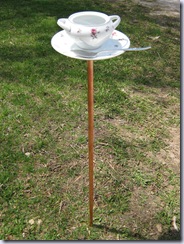
IMG_0747It’s a sugar bowl  bird feeder/waterer

Here’s a closer pic
IMG_0745
I got the inspiration here from a teacup bird feeder tutorial.

I could not find any teacup/saucer combinations I liked, so I went with a sugar bowl. I actually like this better. It has a bigger area for water than a teacup and I could use a bigger plate and spoon that would not look out of place if using a smaller teacup.

Basically, this is how I made it.
1) Plan this for several days in advance, because you need to have the glue cure.
2) Find a nice sugar bowl, plate, and spoon. either of your own or from a thrift store or garage sale.  Mine were matching, but you could certainly do coordinating or even contrasting colors.
IMG_0749           Even my spoon had a rose on it to match the plate.

3) You need to sand around the bottom of the sugar bowl, the bottom of the spoon and the 2 coordinating areas on the plate where they will both sit to roughen it up so the glue will adhere well. I didn’t take pics of the sanding process, but I think it is self explanatory. Just be sure to sand quite a lot of the glaze off.
4) Glue the bowl and spoon to the plate using E-6000 glue. This is some strong glue that is waterproof. Follow the directions on the package. It takes about 24 hrs. to cure before you can flip it over and do the backside.
5) After the glue has cured for a day, turn the  feeder over and glue a 1/2” copper cap in the middle of the plate. Again the surface of both the plate and the cap need to be roughened up with sand paper. Make sure to apply a generous amount of glue to the plate and cap, because the cap is usually convex, so you need to make sure it is going to be held over the entire cap.

IMG_0754
Original way.... didn't work out so well.
** UPDATE **
5) It was not sturdy enough with the E-6000 and just that small area to apply glue to. One twist with my husbands strong hands and it wanted to move too easily. This is what we did to reinforce  the cap and make a larger surface for adhesive. My husband soldered a fender washer to the top of the cap and then filed it to roughen the surface and make it even. Meanwhile, I scraped off the glue from the bottom of the plate and sanded a larger area to accommodate the fender washer size. This time around, I glued it with waterproof epoxy. It dried to a light amber color , but that's ok, since it's underneath and won't be seen. After curing for 24 hrs., it's solid and not going anywhere.
New improved version with a fender washer soldered to the cap
               I didn’t even bother to remove the entire tag, since it will be on the bottom and not show.

       
6) In the meantime; while you wait for this glue on the bottom to cure. You can prepare the stake. This is made from a 36” piece of 1/2” copper tubing. I bought a 10’ piece at the hardware store because I plan to make one of theses for myself as well, but I saw you could get these in 5’ sections also, which were more expensive/ft. Personally, I think I might like more than one of these in my yard. Cut the tubing with a pipe cutter if you have one, or a hacksaw. Sand around one end of the tubing as far as the cap will go on, so that the cap will slide on easily. These are very tight fitting; after all, they are made to hold water. On the other end, hammer the tubing flat , to make a “knife edge”  to poke into the ground easier.
IMG_0749

7) Stick the pipe into the ground about a foot. Once the glue has cured on the back of the plate, you can turn it over, slip it onto the pipe, and fill the bowl with water and put some bird food on the plate.

Here's the bird feeder in my in-laws front yard with bird seed and water.


This is the card I made to go along with her gift:
IMG_0753The envelope I made last year out of a heavy magazine cover.

Here’s a closer look at the card. It is a “Do Not Disturb” hanger for the door.
IMG_0751 I got the inspiration here.


Happy Mother’s
Day
Linking to:
Fine Craft Guild


Photobucket

Tuesday, May 3, 2011

Baby Shower Gifts

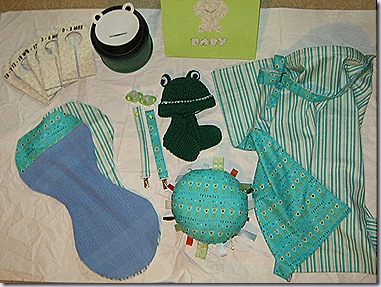
I attended a baby shower a couple of weeks ago. The mom-to-be likes frogs, so I tailored my homemade gifts to go with that theme.
IMG_0699
Hooter Hider
IMG_0701
I pretty much followed the tutorial here, except I used a metal fastener and I always double seam, to make sure the seams are not going to rip apart easily.
IMG_0699
Frog Hat and Booties
For the booties, I used my standby Best Crochet Slippers pattern, but adjusted the pattern to make them smaller, by using a smaller hook, only one strand of yarn, and less rows.
IMG_0712
For the hat, I followed the pattern here, except I did the eyes a little different and I used 1/4” ribbon instead of yarn for the contrasting edge.
Burp Cloths
IMG_0703
This is the tutorial I followed, roughly. Mine had a more rounded shape on the ends.  To achieve this, I used a dinner plate to trace a pattern of 2 circles, then joined the circles with an inside arc. I used bar towels for the absorbent backside.
Ribbon Tab Toy
IMG_0708 IMG_0707
Here’s what I did:
1) I basically just traced a circle with a dinner plate onto 2 fabrics, 1 cotton and the other fleece and cut them out.
2) Cut various lengths  of ribbons ranging 2-4”.
3) Fold the ribbon strips in half and pin them between the the 2 circles of fabric right sides together, ribbons in toward the middle. 
4) Sew around the edge of the circle with a 14” seam, leaving about a 3-4” opening for turning, (leave out 1 ribbon until after it is turned and stuffed). I always double seam, to make sure the seam is sturdy. Turn it right side out.
5) Wrap a large bell , or several small bells, with poly batting. Put about 1/3 of the batting in through the opening, then put in the wrapped bells and finish stuffing with poly batting.
6) Slip stitch the opening closed along with the last ribbon.
Pacifier Leash
IMG_0706Follow the tutorial here 
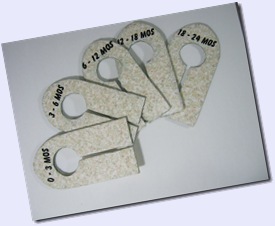
Closet Dividers
IMG_0709
For these, I made a template out of cardboard, traced them, and cut the shapes out of foam board. I covered them with contact paper and used acrylic craft paint to color around the edges. I cut out the letters on my Silhouette, applied them, and Bob’s your uncle. Easy Peasy!
Froggy Bank
IMG_0713 IMG_0715 IMG_0718 IMG_0720
I made this bank from a recycled coffee container. It was decaf, since that’s the kind that comes in green.
Here’s what I did:
1) Removed the label with Acetone. They do not make paper labels anymore, but paint them on, so it is a little more difficult to get a label free surface.
2) Clean the container up real well. I place newspapers inside to get rid of the coffee smell. Most of it was gone the next day
3) I cut out the frog and phrases on my Silhouette, but you could easily draw these on with a permanent marker.
4) Cut a slot in the top. I made a frog face (with no mouth) on my Silhouette and placed it so the slot is the mouth and the ears stand up on the edge. I left the backing off on the vinyl behind the ears so they would not stick to the container.
The irony of this is that the container came from the mom-to-be in question!  In fact she asked me what I was doing with it. I told  her I couldn’t tell her and she left it at that.
Gift Bag
IMG_0704
All these goodies went into the gift bag I decorated with a frog.
 Have A Hoppin’ Good Day!
Technorati Tags: ,,,

Monday, May 2, 2011

SILHOUETTE LOVE

A few weeks ago  we celebrated my Mother-in-law and Father-in-law’s 60th wedding anniversary. Each child’s (of theirs) family was asked to contribute some type of wall decoration, poster, pics, etc., to decorate the church cafeteria, which was where the affair was held.  This post is a long time coming, because I was waiting for nice clear pics from the photographer that was there that day. Unfortunately, either the pics of the tree did not turn out or she forgot to take them, so I’m stuck with my usual point and shoot camera pics.
This was our contribution:
IMG_0669
What I did was to make hearts on my Silhouette. For the children, of which there are 8, I started each branch with the child’s and spouse’s name and the year of their marriage in another heart at the bottom. Next on the branch came the child’s children (grandchildren),  followed by their children (great-grandchildren). For these it was just the grandchild’s name and spouse (if applicable) and just the great-grandchildren’s name on hearts after each of their parents.
IMG_0669  IMG_0669
I used an online poster maker, Block Posters, to make an image of a tree trunk, which I cut out from black poster board and placed the branches starting from it in a willow tree type shape. Here it is laid out on the living room floor to check for size and composition.
IMG_0652
Across the top of the trunk I put the cut out phrase “All Because Two People Fell In Love” on a gold ribbon.
IMG_0669
Under the ribbon; the tree trunk is attached, with thumbtacks, to a cork strip that runs across that short section of wall in the church cafeteria. That was a pretty sweet way to put it up. Luckily, nobody else needed that much space, so I could use it.
For the anniversary couple, I made a B&W copy of their wedding photo and placed it in a heart which I cut out of wood print contact paper. The two intertwined hearts at the bottom contain their names and date of their wedding.
IMG_0669
I took these pics the day before the event when we set up for the party, so I don’t have a final pic of the Family Tree. What I added was a large Black Heart at the center top  with  60th Anniversary and the date of the party, just because I felt it needed something in that space up there. I think it turned out rather well and I got numerous compliments on it.
I left the backing on the hearts and just cut out the main part, so that we could just attach them with some double sided carpet tape and each sibling could take their family’s branch home with them to do as they pleased. I plan to make some sort of framed picture with our family’s hearts.
IMG_0669 
Have A Lovely Day!

Linking to:


Technorati Tags: ,,